|
That's it, I'm officially hooked on digital sketching and painting. To the point that my mind's looking for it in random. I like the way I get lost in the midst of drawing and painting, and I love not having to look for the right brushes and/or get a change of water, while being able to get a specific textural effect with a click of the mouse. I appreciated Matt Kohr's advice on starting out with traditional and manual drawing prior to proceeding to digital painting. He's right about being able to substantially improve drawing skills before translating everything into digital media. While I'm still on the learning curve on how to create digital artworks, I appreciate how far I've come. For one thing, I didn't actually realize how much I missed drawing until I started on the 30-day challenge. Perhaps the 30 day drawing challenge was the major stepping stone. Plus, having some flexible time on my hands to seriously get into video tutorials and the like. It's important to keep the flow of inspiration coming, as I learned that it is one sure nifty way to build your own virtual mental library of concepts, ideas, etc. Another crucial thing I re-learned about drawing is critical observation. Much like in interior design, drawing and art delves into the details. It's a step by step process wherein, if you don't get the right proportions and angles of your visual representation, the details can fall flat. Achieving the right structure takes a lot of practice as well as a trained eye. I find myself subtly looking at an object or surrounding, observing the tonal value changes, the way a shadow is cast in relation to the light source, and if I would interpret it, where would I start? I was climbing up the stairs earlier only to notice how the light bounced off the shiny wood finish of the balusters, and I found myself thinking visually on how I would draw the rounded shapes while trying to remember if I knew how to render glossy objects. (Which I don't think I've touched on yet in the tutorials). Basically, I do believe that I'm learning a lot, and growing in passion for art as well. I am pretty sure the time will come when I have a great built-in virtual memory library of things I've observed and studied enough to create an artwork using minimal reference. I think that is where I'm ultimately headed, but until then, I'm enjoying the process and I'm learning to trust my instincts when it comes to art. Ending this post with my latest digital sketching venture (a walker zombie inspired by the Walking Dead. In a nutshell, I've no experience working with human anatomy and figure--must make a mental note to do study sketches of human figure--and drawing this zombie made me imagine a human skeleton with parts of his skin eaten up. Like, how deep-set the bones in the skull are made to fit the hollows of human eyeballs. This goes true for the teeth and the jaw as well. There were so many crevices and recesses involved in the detailing, and this was where most of my time went as I painted this. I wanted it to look as frighteningly authentic as possible. So yeah--there we are, my first rendered Walker Zombie.)
0 Comments
30 Day Challenge Day 21 is to draw a Wizard, so here I was thinking of the first wizard that would come to mind (although I did think of Harry Potter, I did want to do a "traditional looking" wizard like Dumbledore, Gandalf or Saruman). I ended up picking a reference photograph of Saruman from LOTR. This post is pretty similar to the step-by-step process I outlined yesterday, so I'll make a quick run through this. 1. Gesture Sketch:  2. Sketching the basic features:  3. Layering secondary line work:  4. Finished line work:  5. Completed rendering:  It took quite some time to get the facial features, as Christopher Lee's face is really striking. I took my time studying his face and rendering the tonal values that contributed the best results, while paying attention to the significant details. I enjoyed the most while doing the rendering portion, especially upon highlighting Saruman's hair (it became a matter of learning how to adjust brush diameter--I worked mostly with a soft round brush using opacity jitter for this). The coolest thing about doing this was that I felt like I was using mixed media--colored pencils for the finer strokes, while paint strokes and eraser tool were what I mostly used for rendering his wizard's robes and the shadows. I had a lot of fun using a neutral beige background, taking advantage of the fact that my subject is a White Wizard.
Upon studying the finished product, here are my insights: (1) I think I could study more on detail control and closer detail study, and (2) It would also help to learn about rendering skin tones (I admit that I didn't bother changing his skin tone to fit the mood of the painting). (3) I liked the overall tone value of the piece, the gradation from the shadow areas to the highlights. I found that it was good practice for being aware of different tonal values and how they contribute to the bigger picture. I'll probably do another digital painting as soon as I complete another CTRL + Paint worksheet. I have to say that I am happy with being able to seriously take up digital painting as it has been something I've wanted to do for a long time. I'm taking a quick break from digital painting and will start on doing sketchup models for some projects. Stay tuned! the processI feel like I've hit a milestone today. And it is a good feeling: being able to learn and try my hand on new skills like digital painting; and being able to apply an important principle from the book 7 Habits of highly effective people, special mention of the 7th habit: Sharpening the saw. I was watching some of Matt Kohr's tutorial videos earlier today on all sorts of topics like Gesture Drawing, Basic Rendering, and Sketching Lines. It was so easy to get absorbed watching videos that they seem to blend from one to the next without clear distinction. I find that these are the best things about watching his videos: (1) they provide you with so much insight on the approach he takes towards sketching and rendering. This is a big thing when it comes to working on digital art as he breaks down a seemingly complicated process to the very roots. His process is systematic, easy to understand and plain and simple--it works. (2) Matt makes things look incredibly easy, when the truth is--it's a lot of practice and how well you are able to synthesize everything you have learned. He creates these cool exercises that lets you practice your hand and keep improving. Basically, I see the logic and discipline that Matt is imparting through his videos and drills. For instance, applying gesture drawing. He teaches you to start out with a blue pencil/crayon and make broad strokes that indicate shape and form rather than the detailed structure of a reference image. Gesture drawing is basically movement coming from the shoulder muscles. It's loose, it's indicative, and it's very blocky. He usually does this as an initial pass to block out where components of the drawing are supposed to be. While doing my 30-day Challenge today, I took a leap of faith in drawing digitally. I've made it a point to sketch my past 30-day challenge drawings manually because practice is essentially practice, and between digital media and traditional media, it is easier to exert control and pressure on the latter. I followed Matt's process, using Gesture drawing as an initial pass as seen below (Image 1) and setting the opacity of the first layer to a lower percentage, I proceeded to the second pass by roughly sketching the form while focusing on the pose of the subject, which I found to be the challenge in this particular drawing.  Image 1: Gesture drawing pass On my third pass, I did some cleaner line work while drawing over my initial passes, refining the details as I went. Then I finally got the final line art into place and started introducing the main tonal values (jumping from shades of gray). Since I darkened my background from pure white to a lighter shade of gray, I was able to use a lighter shade of gray plus the eraser tool to create the highlights. I was creating temporary layers (as Matt calls them, "temp layers") all through out, so as to facilitate ease of making brush strokes and eraser marks without worrying about working outside the lines. I also used Matt's blending techniques (though I'll admit that somewhere along the line, the rendering became quite not as smooth as it was in the beginning). Especially the background, which was the least of my priorities (as I really was focusing on my subject). 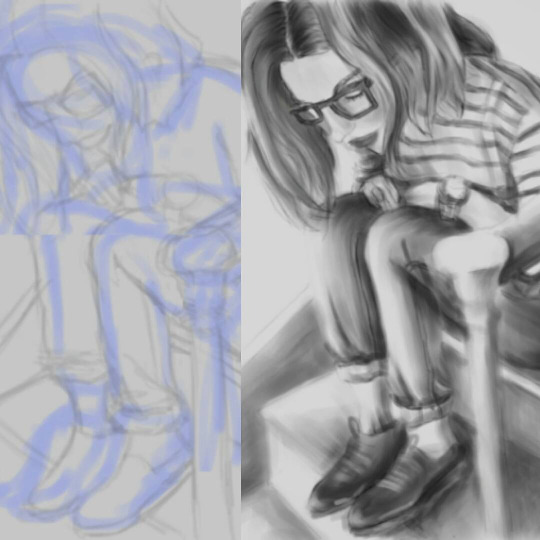 Image 2: Initial and Completed When I was satisfied with the rendering, I merged the layers and removed unnecessary lines as a bit of a clean-up step. Did some extra details on the shoes (though I was quite tempted to just darken them and get it over with) but I do like the way the shoes came out. Looking at the completed image, I'd have to say it was an enjoyable experience to practice some digital sketching and rendering. I like the loose, not-overly-detailed effect. It was a challenge using the tablet to draw for the first time as it requires some hand-to-eye coordination. It was also a challenge to be able to switch from different commands and keyboard shortcuts. Sometimes my fingers got confused between pressing the mouse, the tablet and the keyboard at different points in the process. There is definitely room for improvement, especially with the not-so-smooth rendering of the background. And maybe I should have added a jeans-like effect to the pants so as to make it look more realistic. Either way, I'm pretty grateful that I've learned a lot from Matt Kohr's tutorials and (finally!) was able to experience digital sketching. I can't wait to do another one! 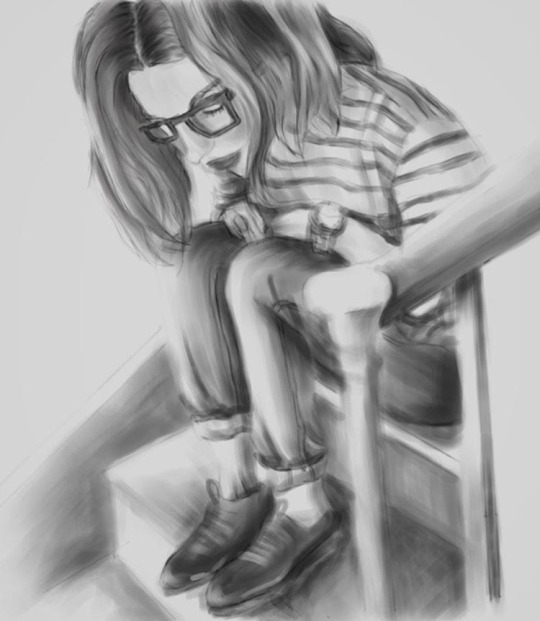 Image 3: Completed (Click image below for link! Or use the drop-down Menu > Gallery)  The Nonsensical Gallery Woohoo! So I finally get some time today (well actually I slid a tiiiiiny bit off my schedule) to upload some of what I've been doing the past few years. Okay, so I wasn't as "dormant" as I originally thought. Though to be quite honest, what I've started at most this year (so far) has been my 30-day challenge sketches. I figured that if I could stick to drawing as a formed habit (studies say it takes 21 days to form a habit), I'd be able to really make it a part of my everyday routines. Somehow, this is also my way of curbing my fear of failure and my self-doubt tendencies. Actually, part of the reason I started all of this is to somehow go back to building and creating on the foundation of my self-worth, something I've been struggling with these past few years. Oftentimes, I've had to face my worst enemy here: myself. I have this "not good enough" BS that's pretty much one of my extreme Dark Side traits. And one of the wisest things I've learned so far is that the opposite of Love is not actually Hate, but Fear. Yup, fear sure does make us all human, but learning to overcome fear has always been the major challenge. I'm sure Star Wars fans can attest to that (insert Yoda's famous lines here). One of my closest friends actually summarizes everything so clearly in her blog post about Fear (click image below). She's one of the most positive people I know, and it's a powerful thing to get to talk to her and read her blog posts as she is so attuned to her spirituality. I genuinely enjoy browsing her blog as well. Check it out:  Credits: hekimasophia.tumblr.com In essence, this blog, Nonsensical Whim, is a manifestation of my passion to create art and to be continually inspired by art. It is a powerful way of experiencing the essence qualities of self-love, commitment, and most importantly, passion. This blog is a way for me to experience learning and gratitude for what I have been taught. It is the most tangible and visible reminder for me to never give up on what I love doing, and for me to be able to commit to something bigger than myself. More importantly, this is also a journey to finding and experiencing worthiness.
Dude! I can't believe I'm starting out a new blog post after the years I stopped doing personal blogging. The novelty of it is actually both unnerving and fun at the same time. Nevertheless, I wanted to start out by blogging about one of the most important tutorial sites I've ever had the opportunity to learn from, and that is:  CTRL+PAINT Credits: conceptartworld.com About the siteCtrl+Paint.com is one of the best websites out there for aspiring digital (and manual) artists. Matt Kohr, the guy who owns the website, regularly uploads tutorial videos every Thursday. He uploads 4 to 5 minute videos that simulate a classroom/virtual learning environment. The lessons are brief, concise, and very straightforward. In these videos, he provides great tips, practice and homework, and the things to avoid doing. The video library I just linked is his main page--he's organized the tutorial videos into categories: (1) Traditional Drawing and Drawing Techniques (Matt explains that it's best to brush up on traditional drawing skills as this is the very foundation of learning how to paint digitally). (2) Switching to Digital Painting (3) The Advanced Digital Painting Techniques, and (4) Mental Approach towards drawing and painting. He's also got an online store selling his books on concept art, essential skills, etc. though his website and video tutorials are already very informative and newbie-friendly. THE EXPERIENCEI stumbled on his website on one of those days when I was casually surfing the Internet for artists to learn from. I'd have to say that his website is not only super informative, it is one of the best tutorial sites out there. It caters to people who are not familiar with drawing and want to learn from scratch. I just love his site because the videos he posts makes one feel extremely welcome to learn drawing, as he emphasizes that drawing is a skill to build on and can be learned by anybody who is willing to practice everyday. What I love best about learning from him is that he always gives some practical and useful advice and techniques to start out. Some of the more important techniques I learned were the use of the visual measuring tool, and methods like contouring and blocking-in shapes. He emphasizes that drawing is pretty much like learning how to visualize objects in 3D, and that it is key to every drawing to be able to master form (not shape). Contouring and linear blocking-in were both very efficient methods for me, and seeing how my approach was able to swiftly change from getting the details down to starting a drawing from the visual measuring process really made the difference. His tutorials actually gave me that confidence boost in drawing, and I truly feel the measure of improvement. Another thing I learned from him was to not be afraid of "bad drawing days". I used to hate looking at a blank canvas, not knowing where I should start and what I should do first. I'd pretty much say that his techniques have helped me a whole lot. Right now, I'm watching his videos every other day and slowly veering towards his digital painting videos (he encourages people to try out the traditional drawing video sequence before making the switch to digital tools). It makes me feel like I've been through a real art course with a really patient lecturer. He really knows his stuff, and is completely understanding of how it is to practice drawing as a beginner. Intermediate learners also stand to learn a lot from his videos--it's been like a "Back to Basics" journey for me, coming from a long drawing and art hiatus. The fact that watching his videos has encouraged me to get back into drawing has shown me that he's already made a big impact in my learning process. Openness and a thirst for knowledge to learn and re-learn techniques are what mainly guided me back from missing drawing to actually drawing again. Attaching a Ctrl + Paint video from Youtube : DIGITAL PAINTING MASTERS : INSPIRATIONAL STUFFI recently discovered some pretty amazing artists who post their painting process and speed painting videos on Youtube. Here are some of my favorites: 1. Webang111 I'm linking one of the best artists I've seen doing detailing, patterns and just overall really amazing. Her name is Akekarat Sumatchaya from Bangkok, Thailand. She uploads a lot of speed-painting art on YT, and the best thing is that she starts from scratch. Both her Youtube and Deviant art accounts are really inspiring. Gosh, what I wouldn't give to be able to watch her process in real-time! Her artworks are really beautiful, and her attention to detail is impeccable. This is one of her latest works, Silver Bird. 2. Sinix Design Oh gosh, this guy's art is AMAZING. Also discovered him via Youtube, and he's posted some really interesting video playlists. He seems to be one of those artists who are self-taught, and in digital painting, that is one amazing feat. He's one of those guys who just really has fun with digital painting. Linking one of his concept drawing videos below: 3. FZD School Feng Zhu is like, hands-down, one of the most professional artists out there. He has all sorts of posts related to concept art, digital drawing, painting, you name it. He also has podcasts about professional hurdles and experiences, and he's definitely not afraid of sharing what he has gone through to really get into what he does for a living. He's got these Design Cinema series that's spanning to almost over a hundred videos, and watching his videos more often than not gets your jaw dropping. I appreciate how he discusses his process and focuses on specific subjects at a time in his Design Cinema series. Linking one of the best ones out there: There are a lot more concept artists I look up to and admire besides the ones I've mentioned, and I'll probably link more in future blog posts. There's nothing like inspiration to get your imagination and gears kicking in. And watching these people start these paintings from a virtually blank canvas is seriously inspiring. |
Nonsensical whimHi, I'm Ashley. This is my blog on journey towards discovering art and documenting my learning experiences. (Particularly Photoshop, Digital Painting, Sketchup/V-ray, Interior Design, fun tutorials I've discovered and the like). wordpress:TUMBLR:Archives
December 2018
Categories
All
|


 RSS Feed
